Introduction
Quiz funnels are one of the most powerful lead generation tools in digital marketing. They engage visitors, collect valuable first-party data, and help you understand your audience’s needs, all while qualifying leads and maximizing conversion rates.
But here’s the problem: without proper tracking, you’re flying blind.
You might be collecting leads and sending them over to lead distribution platforms like LeadsPedia or LeadProsper, but do you actually know which quiz questions resonate most? Where your users drop off? Which answer combinations indicate high-intent leads that buyers will actually accept? And most importantly, are you leveraging this goldmine of data to build laser-targeted audiences for your Facebook and Google ad campaigns?
That’s where Google Tag Manager (GTM) and the DataLayer come in.
At LanderLab, our users have built thousands of high-converting landing pages and quiz funnels across different industries. One question we hear repeatedly is: “How do I track my quiz and use that data for better advertising and higher-quality leads?”
In this guide, you’ll learn exactly how to implement quiz funnel tracking using GTM and the DataLayer.
We’ll cover:
- What the DataLayer is and why it’s essential for quiz tracking
- The key events you should track in every quiz funnel
- Step-by-step implementation with code examples
- How to configure GTM to capture and distribute your quiz data
- Real-world scenarios for using this data to improve lead quality and ad targeting
DataLayer vs GTM: What’s the Difference?
Before we dive in, let’s clarify these two components:
DataLayer = The Messenger
The dataLayer is a JavaScript array that stores data about user actions on your page:
dataLayer.push({
'event': 'quiz_step_view',
'step_name': 'Personal Information'
});GTM = The Distributor
Google Tag Manager listens to the DataLayer and sends that data to Facebook, Google Ads, Analytics, and other platforms.
Think of it this way:
DataLayer speaks -> GTM listens -> GTM tells Facebook, Google, etc.
You need both working together. The DataLayer without GTM is useless, the data just sits there. GTM without a DataLayer has nothing to listen to.
The Two Events to Track
For quiz funnels we will focus on these two events:
1. Quiz Step View
Fires when a user views a step.
Why track it:
- Identify drop-off points
- Build retargeting audiences (e.g., “viewed 3+ steps but didn’t complete”)
- Measure engagement depth
- Score lead quality based on progression
2. Quiz Submit
Fires when a user submits the quiz.
Why track it:
- Track actual conversions
- Capture all quiz submits for segmentation
- Send rich data to lead buyers (higher acceptance rates)
Step 1: Install Google Tag Manager in LanderLab
LanderLab makes GTM integration incredibly simple with direct built-in support.
Create GTM Account
- Go to tagmanager.google.com
- Create a container (or use existing)
- Get your Container ID (e.g., GTM-XXXXXX)
Add GTM to Your LanderLab Quiz
Instead of manually adding code snippets, LanderLab has a built-in GTM integration:
- In LanderLab, go to Landing Page Settings
- Click on Pixels
- Find the Google Tag Manager section
- Enter your GTM Container ID (e.g., GTM-XXXXXX)
- Save Settings
That’s it! LanderLab automatically handles all the GTM installation code for you. No manual code placement required.

Step 2: Implement Quiz Event Tracking
LanderLab fires specific JavaScript events that you can listen to and push to the DataLayer.
Reference: LanderLab Quiz Events API
Track Quiz Step Views
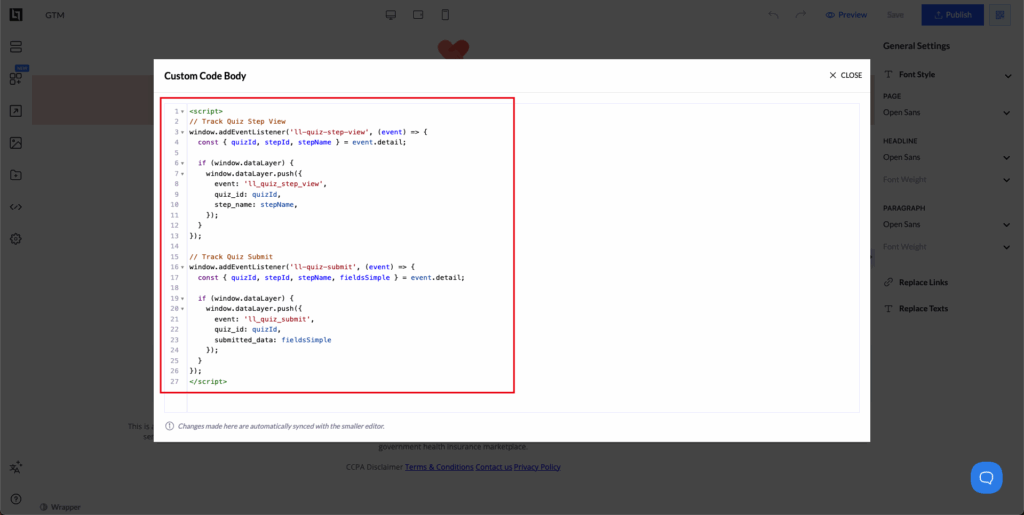
Add this code to your quiz page (in Code Editor, Settings -> Custom Code or via GTM):
window.addEventListener('ll-quiz-step-view', (event) => {
const { quizId, stepId, stepName } = event.detail;
if (window.dataLayer) {
window.dataLayer.push({
'event': 'll_quiz_step_view',
'quiz_id': quizId,
'step_id': stepId,
'step_name': stepName
});
}
});What this code does:
- Listens for LanderLab’s ll-quiz-step-view event
- Extracts quiz and step information
- Pushes it to the DataLayer with event name ll_quiz_step_view
Track Quiz Submissions
window.addEventListener('ll-quiz-submit', (event) => {
const { quizId, stepId, stepName, fieldsSimple } = event.detail;
if (window.dataLayer) {
window.dataLayer.push({
'event': 'll_quiz_submit',
'quiz_id': quizId,
'step_id': stepId,
'step_name': stepName,
'submitted_data': fieldsSimple,
'timestamp': new Date().toISOString()
});
}
});What this code does:
- Listens for LanderLab’s ll-quiz-submit event
- Captures all submitted data and quiz information
- Pushes it to the DataLayer with event name ll_quiz_submit
- Includes the complete form data in fieldsSimple (e.g., { Name: ‘John’, Email: ‘[email protected]’, Zip: ‘12345’ })
- Adds a timestamp for tracking submission time
Step 3: Configure Google Tag Manager
Now that data is flowing into the DataLayer, we need to configure GTM to capture it and send it to your tracking platforms.
Create DataLayer Variables
Variables in GTM extract specific pieces of data from the DataLayer so you can use them in your tags.
In GTM Dashboard:
- Go to Variables in the left sidebar
- Scroll down to User-Defined Variables
- Click New
Create these 5 variables:
| Variable Name | Variable Type | Data Layer Variable Name |
|---|---|---|
| DL – Quiz ID | Data Layer Variable | quiz_id |
| DL – Step ID | Data Layer Variable | step_id |
| DL – Step Name | Data Layer Variable | step_name |
| DL – Submitted Data | Data Layer Variable | submitted_data |
| DL – Timestamp | Data Layer Variable | timestamp |
For each variable, click New -> select Data Layer Variable -> enter the names from the table above -> Save.
When you’re done, you should have 5 variables created.
Create Triggers
Triggers tell GTM when to fire your tags. We need two triggers – one for step views and one for quiz submissions.
Trigger 1: Quiz Step View
- Go to Triggers in the left sidebar
- Click New
- Click on the trigger configuration area
- Select Custom Event as the trigger type
- Trigger Configuration:
- Event name: ll_quiz_step_view
- This trigger fires on: All Custom Events
- Name your trigger: LL Quiz Step View
- Click Save
Trigger 2: Quiz Submit
- Click New again to create another trigger
- Click on the trigger configuration area
- Select Custom Event as the trigger type
- Trigger Configuration:
- Event name: ll_quiz_submit
- This trigger fires on: All Custom Events
- Name your trigger: LL Quiz Submit
- Click Save
Create Tags for Facebook Pixel
Now we’ll create tags that send your quiz data to Facebook. Make sure you have Facebook Pixel already installed on your page (either through LanderLab’s Pixels settings or GTM).
Tag 1: Facebook Pixel – Quiz Step View
- Go to Tags in the left sidebar
- Click New
- Click on the tag configuration area
- Select Custom HTML
- HTML code:
<script>
fbq('track', 'ViewContent', {
content_name: {{DL - Quiz ID}},
content_category: 'quiz_step',
content_ids: [{{DL - Step ID}}],
step_name: {{DL - Step Name}}
});
</script>- Click on Triggering
- Select the trigger: LL Quiz Step View
- Name your tag: Facebook Pixel – Quiz Step View
- Click Save
What this does: Every time a user views a quiz step, Facebook Pixel fires a ViewContent event with the quiz and step information. This allows you to build audiences of users based on how far they progressed.
Tag 2: Facebook Pixel – Quiz Submit (Lead Event)
- Click New to create another tag
- Click on the tag configuration area
- Select Custom HTML
- HTML code:
<script>
fbq('track', 'Lead', {
content_name: {{DL - Quiz ID}},
content_category: 'quiz_completion',
value: 10.00,
currency: 'USD'
});
</script>- Click on Triggering
- Select the trigger: LL Quiz Submit
- Name your tag: Facebook Pixel – Quiz Submit
- Click Save
What this does: When a user submits your quiz, Facebook Pixel fires a Lead event. This is your main conversion event for optimization. Adjust the value field to match your average lead value.
Accessing Individual Form Fields (Optional)
Thesubmitted_data contains all form fields as an object like { Name: ‘John’, Email: ‘[email protected]’, Zip: ‘12345’ }. To access specific fields (like Zip code for geo-targeting or email for custom parameters), you need to create Custom JavaScript variables in GTM.
Example: Extract Zip Code from submitted data
- In GTM, go to Variables -> User-Defined Variables -> New
- Click on the variable configuration area
- Select Custom JavaScript
- Custom JavaScript code:
function() {
const data = {{DL - Submitted Data}};
return data && data.Zip;
}- Name your variable: DL – Submitted Zip
- Click Save
Use it in your Facebook tag:
<script>
fbq('track', 'Lead', {
content_name: {{DL - Quiz ID}},
content_category: 'quiz_completion',
zip_code: {{DL - Submitted Zip}},
value: 10.00,
currency: 'USD'
});
</script>You can create similar variables for any field in your quiz
Create Tags for Google Analytics 4
Now let’s set up GA4 tracking. You’ll need your GA4 Measurement ID (looks like G-XXXXXXXXXX).
Tag 3: GA4 Configuration Tag (Base Tag)
First, create a base configuration tag if you don’t have one already:
- Go to Tags -> New
- Click on the tag configuration area
- Select Google Analytics: GA4 Configuration
- Measurement ID: Enter your GA4 Measurement ID (e.g., G-XXXXXXXXXX)
- Click on Triggering
- Select All Pages
- Name your tag: GA4 Configuration
- Click Save
Note: If you already have a GA4 Configuration tag in GTM, skip this step.
Tag 4: GA4 – Quiz Step View
- Click New to create a new tag
- Click on the tag configuration area
- Select Google Analytics: GA4 Event
- Configuration Tag: Select your GA4 Configuration tag from the dropdown
- Event Name: quiz_step_view
- Event Parameters: Click “Add Row” for each parameter:
- Parameter Name: quiz_id | Value: {{DL – Quiz ID}}
- Parameter Name: step_id | Value: {{DL – Step ID}}
- Parameter Name: step_name | Value: {{DL – Step Name}}
- Click on Triggering
- Select the trigger: LL Quiz Step View
- Name your tag: GA4 – Quiz Step View
- Click Save
Tag 5: GA4 – Quiz Submit (Lead Generation)
- Click New to create another tag
- Click on the tag configuration area
- Select Google Analytics: GA4 Event
- Configuration Tag: Select your GA4 Configuration tag
- Event Name: generate_lead
- Event Parameters: Click “Add Row” for each parameter:
- Parameter Name: quiz_id | Value: {{DL – Quiz ID}}
- Parameter Name: step_name | Value: {{DL – Step Name}}
- Parameter Name: value | Value: 10 (adjust to your lead value)
- Parameter Name: currency | Value: USD
- Click on Triggering
- Select the trigger: LL Quiz Submit
- Name your tag: GA4 – Quiz Submit
- Click Save
Why use generate_lead ? This is a recommended event in GA4 for lead generation. It will automatically appear in your conversion reports and can be used for optimization in Google Ads.
Step 4: Test Your Setup
Before publishing, you need to test everything to make sure it works correctly.
Test in GTM Preview Mode
- In GTM, click the Preview button in the top right corner
- Enter your LanderLab quiz URL in the “Your website’s URL” field
- Click Connect
- Your quiz page will open in a new tab with a GTM debug panel at the bottom
Test Quiz Step View Event
- Progress through your quiz to the next step
- In the GTM debug panel, look for ll_quiz_step_view in the event list
- Click on it to see details
- Verify:
- The event fired
- Variables are populated with correct values (quiz_id, step_id, step_name)
- Tags fired: Facebook Pixel – Quiz Step View and GA4 – Quiz Step View
Test Quiz Submit Event
- Complete your quiz and submit it
- In the GTM debug panel, look for ll_quiz_submit in the event list
- Click on it to see details
- Verify:
- The event fired
- Variables are populated with correct values (quiz_id, step_id, step_name)
- Tags fired: Facebook Pixel – Quiz Step View and GA4 – Quiz Step View
Verify in Facebook Events Manager
- Go to Facebook Events Manager
- Select your pixel
- Go to Test Events tab
- Enter your quiz URL to start testing
- Complete quiz steps and verify you see:
- ViewContent events firing as you progress
- Lead event firing on submission
- Event parameters showing correctly (quiz_id, step_name, etc.)
Verify in Google Analytics 4
- Go to your GA4 property
- Navigate to Reports -> Realtime
- Complete quiz steps on your site
- In Realtime report, verify you see:
- quiz_step_view events appearing
- generate_lead event when you submit
- Event parameters populated correctly
If everything is working: Go back to GTM and click Submit to publish your container changes. Add a version name like “Quiz Tracking Setup” and description, then click Publish.
Real-World Use Cases
Use Case 1: Retarget Engaged Users
Problem: Users start your quiz but don’t complete it.
Solution: Create a Facebook Custom Audience of users who viewed 2+ quiz steps in the last 7 days, exclude quiz submitters, and show them completion-focused ads.
Result: Recover 20-30% of abandoners at 50% lower CPA than cold traffic.
Use Case 2: Build High-Quality Lookalikes
Problem: Your cold traffic CPL is too high.
Solution: Create a Custom Audience of quiz completers who converted, then build a Lookalike Audience from this seed.
Result: 2-3x better conversion rates than interest-based targeting.
Use Case 3: Segment by Answer Patterns
Problem: All leads aren’t equal, buyers pay more for qualified leads.
Solution: Track answer combinations to identify high-intent vs low-intent leads and create separate campaigns for each segment.
Result: Increase accepted lead rate by 40%+, command higher payouts.
Use Case 4: Exclude Converters
Problem: Wasting budget showing quiz ads to people who already completed.
Solution: Create an audience of quiz submitters and exclude them from acquisition campaigns.
Result: Reduce wasted spend by 15-25%.
Conclusion
Proper quiz funnel tracking transforms your lead generation from guesswork into a data-driven system.
By implementing GTM and DataLayer tracking with LanderLab, you:
- Understand exactly where users drop off and why
- Build highly targeted audiences based on actual quiz behavior
- Improve lead quality and acceptance rates
- Scale campaigns profitably with better data
- Prove ROI with accurate attribution
The setup takes 1-2 hours, but the payoff is massive-lower CPAs, higher lead quality, and the ability to optimize every step of your quiz funnel.
Need help? Check out the LanderLab Quiz Events documentation or reach out to our support team.
Build High-Converting Quiz Funnels in Minutes
Use industry-ready templates, ensure lead accuracy with phone/email/OTP checks, and distribute leads instantly to your buyers, partners, or CRM.
Build My Quiz Funnel

